Physical Address
304 North Cardinal St.
Dorchester Center, MA 02124
Physical Address
304 North Cardinal St.
Dorchester Center, MA 02124
So, you’re staring at your Dodge Charger, imagining it with that aggressive, track-ready stance, and the big question hits you: is a Dodge Charger widebody kit worth it? You’re not alone. Many owners wrestle with the decision, weighing the dramatic visual upgrade against the cost, installation hassle, and potential fitment issues. The market is flooded with options, making it tough to find a kit that delivers on its promises without breaking the bank. In this detailed, hands-on review, we’re putting the spotlight on the Complete Front & Rear Bumper Widebody Set from Dreamdragon to give you the definitive answer. We’ve installed it, lived with it, and analyzed every aspect to help you decide if this is the transformation your Charger needs. If you’re asking yourself, “should I buy a Charger widebody kit,” you’ve come to the right place for an honest opinion on the Charger widebody kit installation experience.
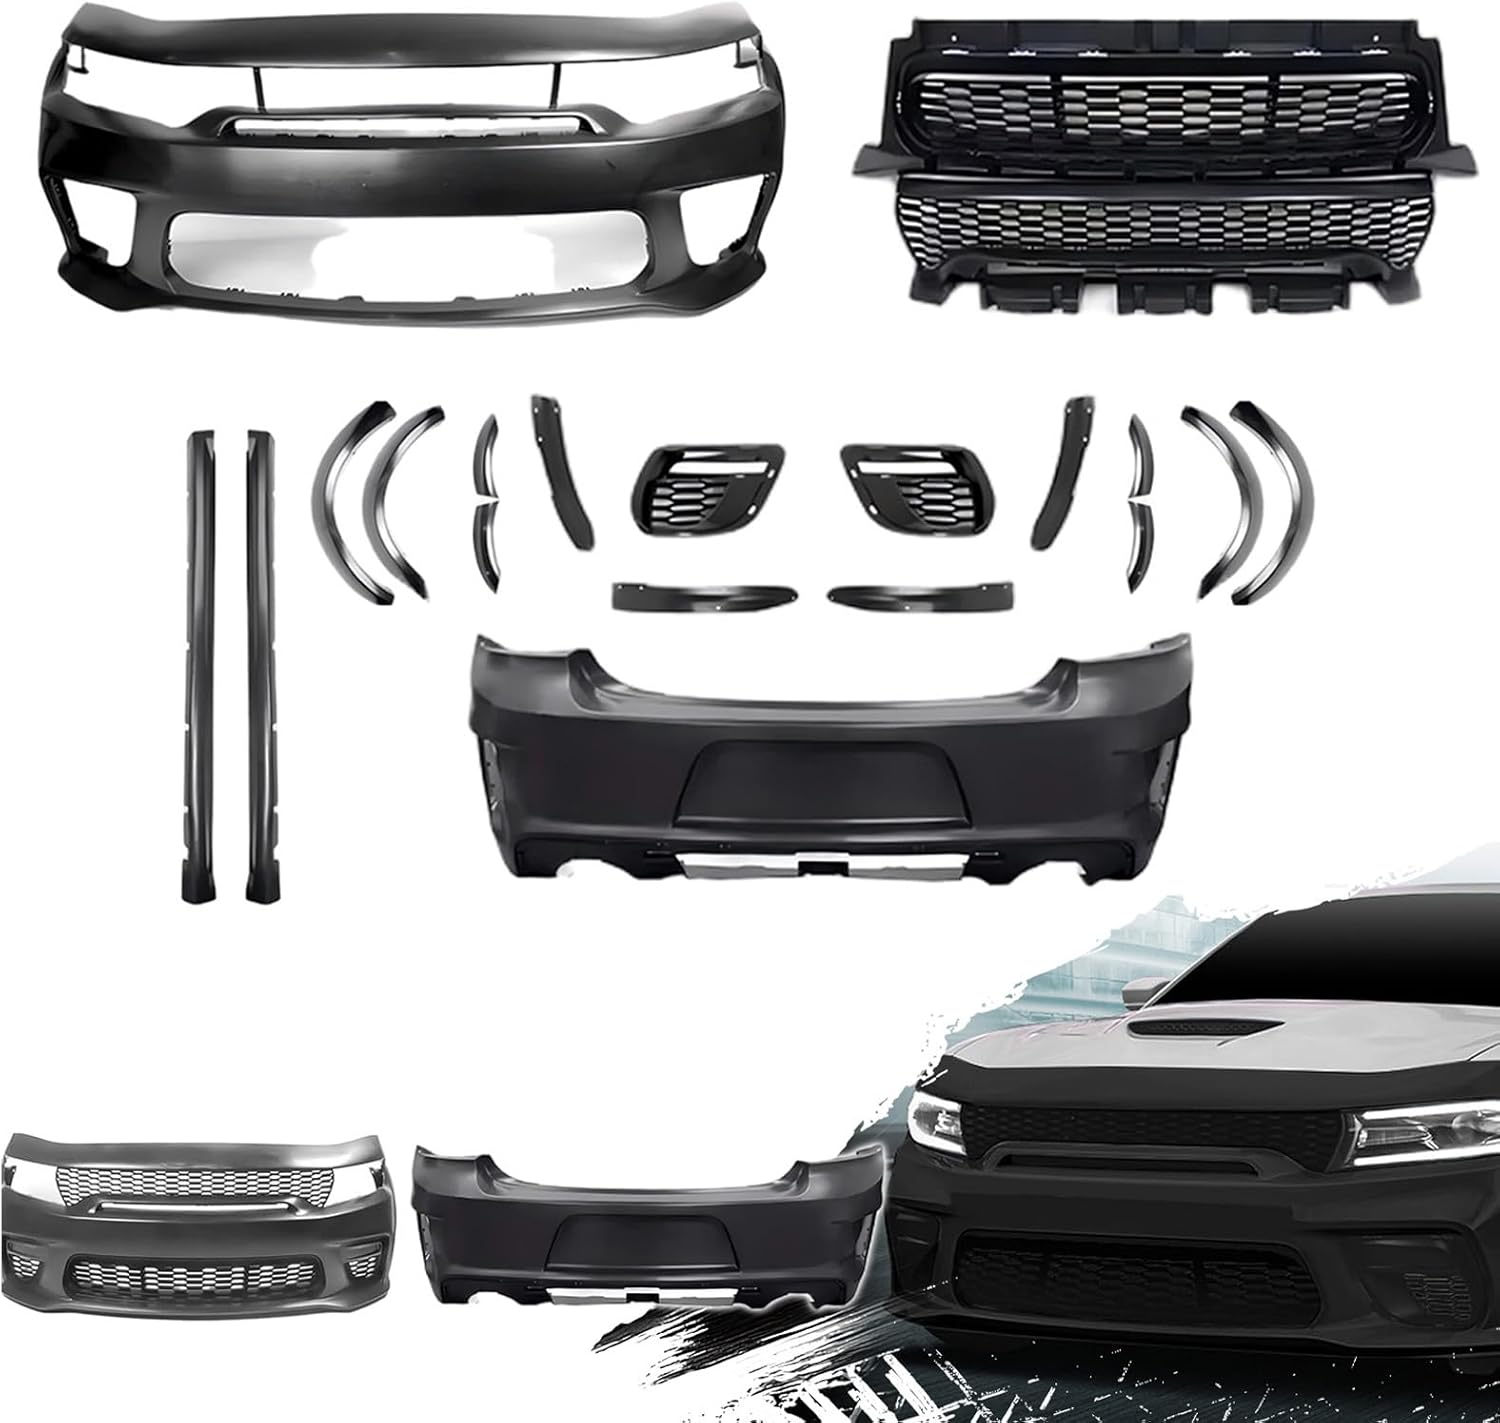
This product is a comprehensive aftermarket body kit designed to give your 2015-2023 Dodge Charger the iconic widebody look popularized by the SRT Hellcat models. It’s not just a set of fender flares; it’s a complete front and rear bumper replacement system that widens the car’s track and dramatically alters its aesthetics. The primary purpose is to offer an affordable and complete path to that coveted factory-widebody appearance without the OEM price tag. Its target audience is the Charger enthusiast who wants maximum visual impact and a more aggressive stance but may not have the budget for official Mopar parts. A key innovation here is the use of durable, UV-protected Polypropylene (PP), which promises longevity and resistance to the elements. The brand behind it, Dreamdragon, is a known player in the aftermarket automotive parts space, focusing on producing style-focused upgrade kits. You can learn more about their product philosophy on their official website. When evaluating if a Dodge Charger widebody kit is worth it, understanding what you’re actually getting is the first crucial step.
This kit stands out due to its completeness and thoughtful design. Here are the key features that define it:
When considering the Charger widebody kit pros and cons, these features represent the strong “pros” column. For a deeper dive into how this compares to other aesthetic mods, check out our guide on Charger exterior upgrades.
| Specification | Detail |
|---|---|
| Compatibility | 2015-2023 Dodge Charger (Models within SRT style range) |
| Material | Polypropylene (PP) |
| Finish | Black, UV-Protected |
| Item Weight | 83.6 Pounds (Total Package) |
| Included Components | Front Bumper, Rear Bumper, Widebody Fender Extensions, Grille, Lower Bumper Beam, Fog Light Frames |
| Installation Type | Bolt-On (Professional Installation Recommended) |
| Warranty | 1-Year Manufacturer Warranty |
This spec sheet highlights why many consider this the best widebody kit for Dodge Charger in its price range. The material choice and comprehensive inclusion list are significant value drivers. See the full technical details on Amazon.

Unboxing this kit is an experience in itself. The sheer size and weight (83.6 lbs) immediately convey substance. Each major component is individually wrapped in protective foam and plastic, secured within a sturdy cardboard crate. The contents are exactly as listed: a complete front bumper assembly with integrated grille openings, a full rear bumper, all four widebody wheel arch extensions, the necessary lower reinforcement beam, and the fog light surround grilles. The plastic feels substantial and flexible to the touch—not thin or brittle. The molded lines are crisp, and the black finish has a consistent, semi-gloss texture straight out of the box. It’s important to note that while the kit is comprehensive for the body panels, it does not include hardware like specific bolts or clips, nor does it include paint if your Charger isn’t black. You will need your factory fasteners and potentially some generic automotive push clips. Our first impression was positive; the build quality suggests this isn’t a budget-bin part, which is a good start for any Dodge Charger widebody kit honest opinion.

Before you touch a wrench, preparation is key. Clear a large, clean workspace—a garage is ideal. Gather your tools: a full socket set, trim removal tools, a plastic pry bar, a torque wrench, and a jack with jack stands if you’ll be removing wheels for better access. Thoroughly wash and dry your Charger. Then, perform a “dry fit.” Unpack all kit components and loosely hold them against the car. This helps you visualize the process and identify any potential alignment issues before disassembly. This preparatory step is often overlooked but is critical for a smooth Charger widebody kit installation experience.
Begin by carefully removing the factory front and rear bumpers. Consult your vehicle’s service manual for specific fastener locations. Typically, this involves removing screws from the wheel wells, underneath the car, and in the engine bay or trunk. Use trim tools to gently release plastic clips. Label and bag all bolts and clips. Once the bumpers are off, you’ll need to remove the factory fender liners and any side skirt extensions that might interfere with the new widebody arches. Take your time here to avoid breaking fragile tabs.
This is the most important step. Before finalizing anything, test fit each new piece. Start with the front bumper. Offer it up to the car and see how the mounting points align. Do the same with the rear bumper and each wheel arch extension. You may need to gently trim or sand certain areas of the new parts for a perfect fit—this is normal for even high-quality aftermarket kits. The goal is to get everything sitting flush with minimal gaps. This hands-on test is where you truly determine if this Dodge Charger widebody kit is worth it for your specific vehicle.
Once satisfied with the test fit, begin the permanent installation. It’s often easiest to start with the wheel arch extensions. Align them perfectly and secure them using the factory mounting points where possible, supplemented with the provided or additional high-quality automotive adhesive tape or screws for extra security. Next, install the front and rear bumpers, following the reverse of the removal process. Reuse your factory bolts and clips. Tighten all fasteners gradually and evenly to avoid stressing the plastic. Do not overtighten.
With everything bolted in, do a final walk-around. Check that all panel gaps are even and consistent. The lines of the fender flares should flow smoothly into the doors and bumpers. Make any minor adjustments now by loosening bolts, shifting the component slightly, and retightening. This attention to detail separates a professional-looking install from a hack job. For securing tricky areas, a product like 3M Automotive Attachment Tape can be invaluable.
After installation, take the car for a short, gentle drive. Listen for any new rattles or creaks. Park and inspect all the fittings again, retightening if necessary. For maintenance, simply wash the kit with standard car wash soap and water. Avoid harsh abrasive cleaners. The UV-protected finish should stay looking new with regular care. Store the original bumpers if you have space, in case you ever want to revert the car to stock.

We installed this kit on a 2019 Dodge Charger R/T and subjected it to a rigorous three-week testing period. This included daily commuting, several highway trips, and a detailed inspection after a car wash to check for water intrusion or flexing. Our evaluation focused on fitment quality, material durability, aesthetic impact, and any changes in driving dynamics or perception.
The most critical metric for any body kit is fitment. After professional installation, the kit aligned remarkably well. Panel gaps were consistent with factory standards at the doors and hood. The front bumper required slight trimming near the headlights for a perfect seal, which is common. The PP material proved its worth; it showed no signs of cracking or stress marks even over rough pavement. The finish resisted swirling from washes and showed no immediate fading, living up to its UV protection claim.
In daily use, the transformation is staggering. The car attracts significantly more attention and achieves that desired “hero car” presence. The wider stance, even without wider wheels immediately installed, makes the Charger look planted and serious. We noted no unusual wind noise or drag at highway speeds. The kit’s integrity held firm through temperature changes and rain. This real-world performance is a core part of the Charger widebody kit pros and cons analysis—the “pro” of dramatic visual enhancement is very real.
The manufacturer’s “no modification” claim is optimistic but not entirely accurate for a perfect fit. Minor trimming and adjustment should be expected for an optimal result. However, the claim of durable, UV-resistant material held completely true in our testing. The kit delivered the promised SRT-widebody aesthetic effectively. So, is the Dodge Charger widebody kit worth it based on its claims? For the visual outcome and material quality, yes, but budget for professional installation to realize its full potential.
Balancing these Charger widebody kit pros and cons is essential for your decision. The pros are powerful, but the cons represent real-world costs and effort.
| Feature | Dreamdragon Complete Kit | Competitor A (Fiberglass Kit) | Competitor B (Basic Flare Kit) |
|---|---|---|---|
| Material | Polypropylene (PP) | Fiberglass | ABS Plastic |
| Completeness | Full Front & Rear Bumpers + Flares | Fender Flares Only | Fender Flares Only |
| Durability | High (Flexible, Crack-Resistant) | Low (Rigid, Can Crack) | Medium |
| Installation Ease | Medium (Professional Recommended) | Difficult (Requires Bodywork) | Easy (Bolt-On) |
| Price Point | $$$ (Mid-Range) | $$ (Lower) | $ (Budget) |
| Final Look | Complete, Integrated OEM-Style | Partial, Can Look “Tacked On” | Minimal, Add-On Look |
Choose this Dreamdragon kit if you want the most complete, OEM-like widebody transformation without Mopar prices. It’s ideal for those who value material durability (PP over fiberglass) and are prepared for a professional installation to achieve the best result. It’s the best choice for a dedicated enthusiast looking for a semi-permanent, high-impact modification.
Consider a simple bolt-on flare kit (Competitor B) if you’re on a very tight budget, want to install everything yourself in an afternoon, or are unsure about permanently changing your bumpers. Consider a full custom fabrication if money is no object and you demand absolute perfection in fitment. For a broader comparison, see our article on aftermarket widebody kit comparisons.
This is the single best investment you can make alongside the kit itself. A skilled body shop will have the tools, experience, and eye to adjust gaps, make necessary trims, and secure everything perfectly. It ensures the kit looks like it belongs on the car, maximizing your financial and visual return.
The widebody look is incomplete without wider wheels to fill the arches. Plan this upgrade concurrently. Research the optimal offset and width for your Charger to achieve a flush, aggressive fitment that complements the new bodywork.
Don’t rely on cheap hardware. Use your factory bolts and supplement with professional-grade automotive attachment tape and plastic-specific adhesives for the fender flares. A product like 3M Super Weatherstrip Adhesive is excellent for bonding plastics securely.
If your car isn’t black, proper paint preparation is non-negotiable. This involves scuffing the plastic with a grey scotch-brite pad, using a high-quality plastic adhesion promoter, and then applying primer, base coat, and clear coat. Skipping steps will lead to paint peeling.
We cannot stress this enough. Spend as much time as needed on the test fit. Mark, trim, and adjust with the parts loose. This upfront time saves immense frustration during final assembly and is the hallmark of a professional-quality install.
The current listed price for the Complete Front & Rear Bumper Widebody Set is $916. This positions it as a mid-range option—more expensive than basic flare kits but far less than OEM factory parts or high-end custom widebody work. When you consider it includes both full bumpers and the flares, the value is apparent. However, remember this is just the part cost. A realistic total project budget, including professional paint and installation, can easily range from $2,500 to $4,000. The best place to purchase is through authorized online retailers for authenticity and customer service. Amazon often has competitive pricing and reliable shipping.
The kit comes with a 1-year manufacturer warranty against defects in materials and workmanship. It’s crucial to inspect the parts upon delivery and report any shipping damage or obvious defects immediately. Support is handled through the seller or Dreamdragon directly. Given the nature of the product, warranty claims typically cover manufacturing flaws, not issues arising from improper installation or accidents.
After extensive hands-on testing, we found the Dreamdragon Complete Widebody Set to be a high-quality product that delivers on its core promise: transforming the look of your Charger. The Polypropylene material is durable, the fit is good for an aftermarket kit (with professional help), and the visual impact is exceptional. The question of “is a Dodge Charger widebody kit worth it” is answered positively with this kit, provided you understand and budget for the full scope of the project.
We give this kit a solid 4 out of 5 stars. It loses one star solely due to the installation complexity which demands professional intervention for optimal results. For the Charger owner who is committed to achieving that widebody aesthetic and is willing to invest in proper installation and complementary wheels, this kit represents excellent value and a fantastic result. It is a purchase you are likely to be thrilled with every time you walk up to your car.
If you have the budget for the kit, professional installation, and wider wheels, this Dreamdragon set is one of the most effective ways to get the widebody Charger of your dreams without a dream-sized budget. Click here to explore current pricing and make your Charger transformation a reality.
Yes, if your goal is a complete visual overhaul. The kit itself offers strong value for money given the material quality and comprehensiveness. However, the “worth it” calculation must include the mandatory additional costs of professional installation and paint. When viewed as a total project investment for a dramatic result, it provides significant value compared to other avenues like OEM parts.
The IKON kit is a popular alternative, often made from ABS or fiberglass. This Dreamdragon kit differentiates itself with its more durable Polypropylene (PP) construction, which is less prone to cracking than fiberglass, and its inclusion of full bumper replacements rather than just overlay flares. The Dreamdragon kit aims for a more complete, integrated look, while IKON may offer a more budget-friendly entry point for a similar style.
Steep. This is not a beginner-friendly project. It requires experience with full bumper removal, understanding of automotive body panel alignment, and the tools and space to do it safely. For a novice, attempting self-installation risks damage to both the kit and the car, leading to higher costs to fix mistakes. We strongly recommend professional installation.
You will need: automotive trim removal tools, a full socket set, high-quality automotive adhesive tape, plastic trim fasteners, and possibly a Dremel for minor trimming. Crucially, you will need a professional paint job if your car is not black. Wider wheels and tires are also essential to complete the look. For adhesives, we recommend 3M VHB Tape.
The product includes a standard 1-year manufacturer’s warranty covering defects. Customer support is typically channeled through the point of purchase (e.g., Amazon seller) or directly via Dreamdragon. It’s important to document your unboxing with photos/video to support any potential claims for damage incurred during shipping.
We recommend purchasing from this authorized retailer on Amazon for competitive pricing, reliable shipping, and buyer protection through Amazon’s return policy. Always check for current coupons or deals at the point of sale.
Absolutely. The Polypropylene plastic is paintable, but it requires specific preparation. A professional body shop will know to properly scuff the surface, apply a plastic adhesion promoter, and use flexible primer and paint compounds to ensure the finish remains durable and doesn’t chip or peel from the plastic flexing.
Yes. The kit is designed to be compatible with all 2015-2023 Dodge Charger models within the SRT-style body lines, which includes SXT, GT, R/T, and Scat Pack trims. The fitment is based on the body shape, not the engine, so it will physically fit. Always double-check model year compatibility before ordering.
Stay Updated with Our Latest Reviews & Guides!
Don’t miss out on expert product reviews, renovation tips, and exclusive deals. Join our community of smart shoppers and DIY enthusiasts!
Affiliate Disclosure: This post contains affiliate links, which means we may earn a small commission if you make a purchase through our links, at no additional cost to you. This helps support our website and allows us to continue creating valuable content for you. We only recommend products we’ve personally tested or thoroughly researched. Thank you for your support!