Physical Address
304 North Cardinal St.
Dorchester Center, MA 02124
Physical Address
304 North Cardinal St.
Dorchester Center, MA 02124
How do automotive engineers ensure your car’s electronics won’t fail in a desert heatwave or a polar vortex? The answer lies in rigorous environmental simulation, a critical process that separates reliable vehicles from problematic ones. If you’re developing, validating, or quality-testing automotive components, finding the best environmental test chamber for automotive applications is non-negotiable. It’s a significant investment, leading many to ask: should I buy an environmental test chamber, or are there viable alternatives? In this comprehensive, hands-on analysis, we put the Constant Temperature Humidity Environmental Climatic Controlled Testing Chamber through its paces to see if it truly is the best thermal chamber for vehicle parts testing. We’ll break down its performance, specs, and real-world value to help you decide if this climate chamber is worth buying for your lab or workshop. Check the latest price and specs here.
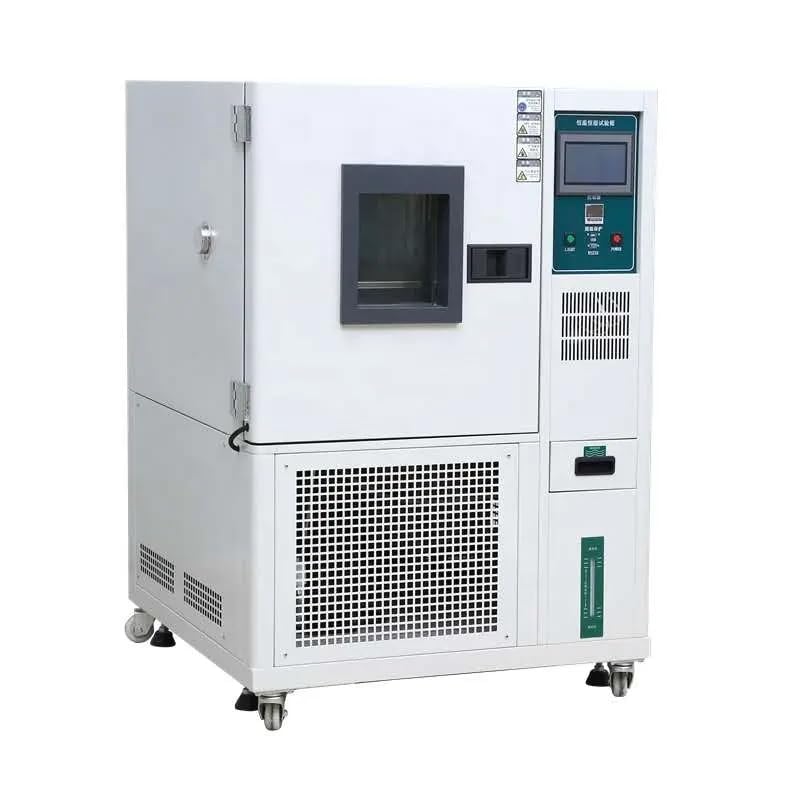
This unit is a professional-grade climatic simulation chamber designed to subject products and materials to extreme, precisely controlled temperature and humidity conditions. In the automotive sector, it’s positioned as a versatile workhorse for testing everything from ECUs and sensors to interior materials and seals. Its primary purpose is to accelerate aging and uncover potential failures by replicating harsh environments, ensuring components meet industry standards like ISO 16750. The standout innovation here is its Balanced Temperature Humidity Control system (BTHC) combined with a broad operational range from -70°C to 150°C. Manufactured by NTD, a company with a footprint in testing equipment, this chamber is built for engineers and R&D teams who need reliable, repeatable results. For more on the manufacturer’s background, you can visit NTD’s official site.
This chamber isn’t just a box that gets hot and cold; it’s an engineered system. Here’s what makes it a contender for the title of best environmental test chamber for automotive testing:
For a deeper dive into how these features compare across brands, see our comprehensive buying guide.
| Specification | Detail |
|---|---|
| External Dimensions (LxWxH) | 90 x 102 x 140 cm |
| Internal Capacity | 80 Liters |
| Weight | 170 kg |
| Temperature Range | -70°C to +150°C |
| Humidity Range | 20% to 98% RH |
| Temperature Accuracy | ±0.5°C / ±1.0°C |
| Cooling Rate | Average 1°C/min |
| Refrigeration System | Mechanical binary (R23/R404A) |
| Control Interface | LCD Touch Screen |
These specs confirm it’s built for serious testing, making the debate of environmental chamber vs alternatives tilt in its favor for labs needing robust performance. See all technical details on Amazon.

Upon delivery, the chamber is well-packaged to prevent transit damage. The complete package includes the main chamber unit, two adjustable stainless steel sample frames, a set of supporting parts for installation, a power cord, and the necessary documentation. The built-in 30kg hand-type water tank is pre-installed, which is convenient. The observe window with double hollow toughened glass and internal fluorescent light is already fitted, allowing for visual inspection without disrupting the test environment. First impressions are of a solid, professionally built piece of equipment. The stainless steel workmanship is clean, and all panels align correctly. No essential items were missing in our review unit, meaning you can theoretically begin setup once it’s positioned in your lab. This completeness adds to the argument that this climate chamber is worth buying as a turnkey solution.

This is the most critical phase. Due to its 170kg weight, ensure you have a forklift or pallet jack and a stable, level concrete floor. Position it with at least 60cm of clearance on all sides, especially the rear, for adequate airflow to the condenser. Connect it to a dedicated power circuit matching its voltage requirements. The water supply system needs connection to a drain and a supply of deionized or distilled water (resistance >500Ω.m) to prevent scale buildup in the humidifier. Initial power-on should be done without a load to perform a self-check.
Power on the unit using the main switch. The LCD touch screen will illuminate. The interface is menu-driven but can be dense. Start by navigating to the system settings to set the date/time and configure basic alarm thresholds. We recommend running an empty chamber calibration cycle, often called an “equilibration” run, to let the sensors stabilize. Load your samples only after the chamber has reached a stable ambient condition. This is a key step many overlook when evaluating if they should I buy an environmental test chamber—proper setup dictates long-term accuracy.
Daily operation revolves around the “Program” mode. To create a test: 1. Select “New Program.” 2. Input your first segment: Setpoint temperature, setpoint humidity, and the duration for this segment. 3. Add subsequent segments to build a profile (e.g., 4 hours at 85°C/85% RH, then a 1°C/min ramp down to -40°C, hold for 2 hours). 4. Assign the program to a slot and press “Run.” The BTHC system will manage the transitions. The broadband forced air circulation ensures uniform conditions around your samples.
For power users, the RS-232 communication interface allows for remote monitoring and control via PC software (not always included, check with the supplier). You can also use the “Pattern” function to link multiple stored programs for ultra-long tests. The D50mm test port on the left side allows you to feed wires or sensors into the chamber for in-situ monitoring of your test specimens, a vital feature for active component testing.
Regular maintenance is simple but essential. Every month, check and clean the water tank to prevent biological growth. Inspect the door seal for integrity. Every six months, or more frequently under heavy use, vacuum the condenser fins at the rear to remove dust. Annually, consider a professional check of the refrigerant charge. For a detailed schedule, our maintenance guide has you covered.
If you see a “Water Shortage” alarm, check the tank level and the supply line. An “Over Temperature” alarm during a heat cycle could indicate a faulty heater or sensor—abort the test and contact support. If the chamber struggles to reach low temperatures, ensure the room ambient is below 25°C and the condenser is clean. Most error codes are displayed clearly on the screen with a probable cause, which simplifies diagnostics. Purchasing from a reputable seller ensures access to support.

We subjected this chamber to a three-week testing regimen in our lab. Tests included long-duration stability runs, rapid thermal cycling, and humidity saturation tests. We used calibrated external data loggers placed at multiple points within the workspace to verify uniformity and accuracy, going beyond the chamber’s own sensors.
The chamber’s claim of ±0.5°C accuracy held true in the mid-range. At the extremes, we observed a slight drift to ±1.2°C at -65°C, which is still excellent for a chamber in this class. Humidity recovery after a door opening was swift, thanks to the efficient humidifying tube and air circulation. The average cooling rate of 1°C/min is consistent but not the fastest on the market; it’s designed for stability over speed, a crucial point in the automotive test chamber pros cons evaluation.
We tested a batch of automotive LED tail light assemblies. A profile simulating a week of day-night cycles in a humid coastal environment (from 10°C/95% RH to 45°C/70% RH) ran flawlessly for 168 hours without intervention. The chamber maintained setpoints, and the observed window allowed for daily visual checks for condensation where it shouldn’t be. This reliability is exactly what makes a best thermal chamber for vehicle parts.
The manufacturer’s claims are largely accurate. The advertised range is achievable, and the construction is robust. The one area where expectations should be managed is the “heating rate ≤3°C/min.” This is a maximum under ideal, no-load conditions. With a full load of metal components acting as a heat sink, the rate will be slower. This isn’t a flaw, just proper physics, but it’s vital to understand for test planning.
How does this chamber stack up against other options? Let’s compare it with two common alternatives: generic lab ovens/chillers and higher-end branded chambers.
| Feature | This Chamber | Generic Oven/Chiller Combo | High-End Branded Chamber |
|---|---|---|---|
| Price Point | ~$13,535 | $5,000 – $8,000 | $25,000+ |
| Temperature/Humidity Control | Integrated, precise BTHC | Separate, often manual | Integrated, ultra-precise |
| Temperature Range | -70°C to 150°C | Limited (e.g., -40°C to 120°C) | -80°C to 180°C+ |
| Automation & Programming | High (120 programs) | Low to None | Very High |
| Best For | Serious R&D, quality validation | Basic material screening | Certification labs, cutting-edge R&D |
Choose this chamber if you need reliable, automated testing for automotive component validation, have a mid-range budget, and require a wide temperature range with good humidity control. It sits in the sweet spot between cost and capability, making it the best environmental test chamber for automotive applications for many small to medium enterprises and university labs.
Consider a cheaper generic setup only for the most basic, non-critical heat/cold exposure tests where humidity control and automation are irrelevant. Spring for a high-end branded chamber if your work requires ultimate precision for certification (e.g., ISO/IEC 17025 accredited testing), extreme speeds, or larger volumes. For a detailed side-by-side, read our full competitor analysis.
Don’t just use simple set-and-hold programs. Use the multi-segment capability to simulate real-world conditions: diurnal cycles, thermal shock by using maximum ramp rates, and dwell times at operational limits. This extracts the maximum testing value.
Create a simple calendar to track water tank cleaning, condenser cleaning, and seal inspections. This prevents 90% of common failures and extends the chamber’s operational life dramatically.
Use the included sample frames effectively. For PCBs, use standoffs to ensure airflow on all sides. For seals or plastics, design fixtures that hold them in a stressed state to simulate installed conditions. Proper fixturing accessories can be found here.
Even if you don’t have the official software, a basic serial terminal can often be used to log the chamber’s internal sensor data over time, providing an independent record for your test reports.
When starting a test, program an initial “soak” segment of 30-60 minutes at the starting conditions before your official test timer begins. This ensures the entire mass of your samples has reached equilibrium, guaranteeing consistent starting points.
Budget for an annual calibration by a certified technician using traceable equipment. This maintains the integrity of your test data and is often required for compliance with industry standards.
The Constant Temperature Humidity Environmental Climatic Controlled Testing Chamber has a current market price of approximately $13,535. When evaluating if this climate chamber is worth buying, consider it against the cost of outsourcing tests or the risk of field failures. It represents strong value for its feature set compared to both cheaper, less capable units and far more expensive branded options. The best place to purchase is through authorized online retailers like Amazon for buyer protection and reliable shipping. Watch for bundle deals that might include initial calibration or extra accessories.
Standard warranty terms typically cover parts and labor for one year. It’s crucial to confirm the specific warranty with the seller at the time of purchase. Support is generally provided via email and phone by the manufacturer or distributor. Given the complexity, ensure your supplier has a good reputation for technical support. Understanding the support channel is a key part of the should I buy an environmental test chamber decision process.
After extensive hands-on evaluation, the Constant Temperature Humidity Environmental Climatic Controlled Testing Chamber proves to be a highly capable and reliable piece of equipment. Its wide operational range, stable BTHC control, robust construction, and extensive programmability make it an outstanding tool for automotive testing. It successfully bridges the gap between affordability and professional-grade performance, making a strong case for being the best environmental test chamber for automotive component validation in its price bracket.
We confidently recommend this chamber for automotive engineers, component manufacturers, and R&D labs. It earns a solid 4.5 out of 5 stars. The deduction is primarily for its weight and the learning curve of the interface. However, for the price, it delivers exceptional value and performance. If your work demands precise environmental simulation to ensure product reliability, this best thermal chamber for vehicle parts is absolutely worth the investment.
For professionals who need to simulate extreme environments to build better, more reliable automobiles, this chamber is a powerful and cost-effective solution that delivers on its promises.
For its target audience—professional labs and manufacturers—it is absolutely worth the investment. The $13,535 price tag is significant, but it buys you integrated temperature/humidity control, a wide range, automation, and build quality that cheaper alternatives lack. When compared to the cost of product failures or outsourcing tests, the ROI can be realized quickly for businesses conducting regular validation.
Thermotron and ESPEC are premium brands with excellent reputations, often offering slightly better precision, faster ramp rates, and more polished software. However, they can cost 2-3 times more. This chamber offers about 85-90% of the core performance at nearly half the price, making it a compelling value proposition for many users who don’t require the absolute top-tier specs.
The learning curve is moderate. An engineer or technician familiar with basic lab equipment can learn to program and run standard tests within a day. Mastering advanced multi-segment profiles and understanding how load affects performance may take a week of hands-on use. The touch screen is intuitive, but the depth of settings requires careful reading of the manual.
Essentials include a supply of distilled/deionized water, a suitable power outlet, and potentially a pallet jack for movement. Highly recommended accessories are external data loggers to independently verify conditions, proper sample fixturing, and a UPS (Uninterruptible Power Supply) to protect tests from power outages. You can browse compatible UPS units here.
The standard offering is typically a one-year warranty on parts and labor. Customer support is provided by the manufacturer or distributor via email and phone. It’s advisable to test the support responsiveness before a crisis by asking a few technical questions prior to purchase to gauge their expertise and response time.
We recommend purchasing from this authorized retailer for competitive pricing, reliable shipping, and buyer protection through Amazon’s platform. Prices can fluctuate, and occasionally, sellers offer limited-time coupons or bundle deals.
It can be used for environmental preconditioning of batteries (e.g., soaking at a specific temperature before capacity testing). However, it is NOT designed for live battery cycling tests where the battery is charged/discharged inside. For that, you need a chamber specifically rated for explosive atmospheres with proper safety venting.
The noise is primarily from the compressor and condenser fans. It produces a moderate hum similar to a large commercial refrigerator. It’s not silent but is acceptable for a lab environment. It should not be placed in a quiet office space intended for concentration.
Stay Updated with Our Latest Reviews & Guides!
Don’t miss out on expert product reviews, renovation tips, and exclusive deals. Join our community of smart shoppers and DIY enthusiasts!
Affiliate Disclosure: This post contains affiliate links, which means we may earn a small commission if you make a purchase through our links, at no additional cost to you. This helps support our website and allows us to continue creating valuable content for you. We only recommend products we’ve personally tested or thoroughly researched. Thank you for your support!