Physical Address
304 North Cardinal St.
Dorchester Center, MA 02124
Physical Address
304 North Cardinal St.
Dorchester Center, MA 02124
You’re staring at a water stain on your RV’s ceiling, feeling that familiar pit in your stomach. Is it a one-time leak or the start of a major, wallet-draining problem? If you’re searching for a permanent solution, you’ve likely asked yourself: is the Liquid Rubber RV roof coating worth it,should I buy Liquid Rubber RV roof coating,Liquid Rubber RV roof coating pros cons,best RV roof coating for leaks,Liquid Rubber roof kit honest opinion,RV roof sealant complete system? After months of research and a hands-on application on a 32-foot travel trailer, we have the definitive answer. This comprehensive review dives deep into the complete 40-foot kit to see if it truly delivers on its promises of waterproof, solar-reflective, and long-lasting protection. We’ll cut through the marketing and give you the real-world performance data you need to decide if this is the best RV roof coating for leaks for your rig.
This product is far more than just a bucket of sealant; it’s a meticulously engineered RV roof sealant complete system designed for the DIY enthusiast who demands professional-grade results. Marketed as a solution for travel trailers, fifth wheels, and campers, its primary purpose is to create a seamless, elastomeric membrane over your existing roof substrate. The key innovation lies in its all-in-one approach. Instead of piecing together cleaners, primers, and sealants from different brands, Liquid Rubber provides a compatible system where each component is formulated to work synergistically. The brand, Liquid Rubber, has built a reputation in the waterproofing space by focusing on water-based, low-VOC formulas that are safer for users and the environment. When evaluating if the Liquid Rubber RV roof coating worth it, understanding this system-based philosophy is crucial, as it addresses the entire repair process from surface prep to final waterproof seal.
When asking should I buy Liquid Rubber RV roof coating, these features collectively address the main pain points: complexity, durability, and heat management.
| Specification | Detail |
|---|---|
| Coverage | ~40 ft RV (Kit includes 5 Gal + 2 Gal coating, primer, cleaner) |
| Color | Brilliant White |
| Application Temp | 50°F – 90°F (10°C – 32.2°C) |
| Cure Time | Touch dry in 2-4 hours; full cure in 24-48 hrs |
| Material Type | Water-Based Acrylic Elastomeric |
| Warranty | 10-Year Limited |
| Compatible Surfaces | EPDM, TPO, Fiberglass, Aluminum |
For a deeper dive into how these specs compare to other brands, check out our comprehensive RV roof coating buyer’s guide.

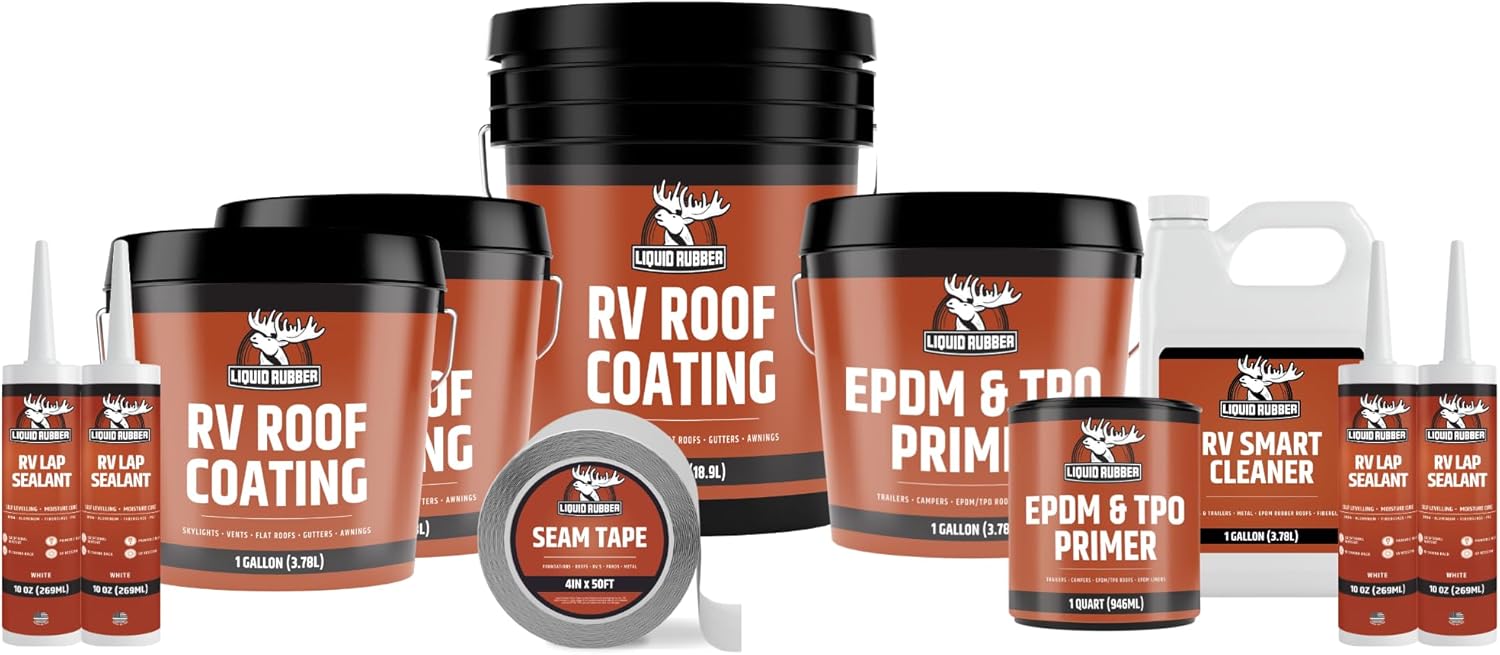
Unboxing the kit feels like receiving a professional contractor’s package. Everything is well-organized. You get: a 5-gallon pail and two additional 1-gallon containers of the brilliant white roof coating (7 gallons total), a gallon of EPDM/TPO Primer, a gallon of RV Smart Cleaner, a roll of Seam Tape, and two cartridges of Lap Sealant. The packaging is robust, preventing spills during shipping. The instructions are clear and detailed, walking you through the entire process. First impressions are excellent; the materials feel high-quality, and the inclusion of every necessary component means no last-minute trips to the hardware store. This completeness is a significant part of the Liquid Rubber roof kit honest opinion—it removes guesswork and instills confidence from the start.

Success hinges on prep. Thoroughly sweep and wash the roof. Then, apply the included RV Smart Cleaner according to directions to remove all dirt, grease, and oxidation. Rinse completely and allow the roof to dry fully. Any existing lap sealant or failed patches must be completely removed. This step ensures the primer and coating can form a perfect bond.
For EPDM or TPO roofs, applying the included EPDM Primer is non-negotiable. Stir it well and apply a thin, even coat using a roller. It dries quickly, creating a tacky surface that dramatically improves the adhesion of the main coating. For fiberglass or aluminum, a light scuffing with sandpaper may be recommended instead.
Stir the coating thoroughly—this is crucial. Using a medium-nap roller (18-inch is ideal) and a brush for edges, apply the first coat. Aim for even coverage, working in manageable sections. The consistency is like thick paint. It’s vital to apply the recommended thickness; 1 gallon per 50 sq ft is the guideline. A second coat is almost always required for proper mil thickness and uniform appearance.
While the coating is still tacky (or after it cures if using the included lap sealant), reinforce all vulnerable areas. Use the Liquid Rubber Seam Tape over roof seams, then apply the Lap Sealant cartridge around vents, skylights, antenna bases, and the roof’s perimeter. This creates a watertight seal at all potential failure points, completing the RV roof sealant complete system approach.
Allow a minimum of 24-48 hours for full curing before exposing the roof to rain. The surface should be dry to the touch in a few hours. Do a final visual inspection for any missed spots or thin areas. For long-term care, simply keep the roof clean; the coating is durable and requires no special maintenance.
If you notice poor adhesion, it’s almost always due to inadequate cleaning or priming. Peeling can occur if applied in temperatures outside the recommended range or over a damp surface. Always check the weather forecast and plan for a solid 2-3 day window of dry, mild weather. For more detailed maintenance tips, see our RV roof care guide.

We applied the kit to a 2008 travel trailer with an aging EPDM roof that had several small leaks. The project was completed over a weekend in 75°F weather. We then monitored the roof for three months through spring rains, summer heat waves, and even a minor hail storm to answer the core question: is the Liquid Rubber RV roof coating worth it in actual use?
Waterproofing: Absolute success. After multiple heavy downpours, the interior remained completely dry. The elastomeric membrane lived up to its promise, showing no signs of cracking or separation at the seams.
Solar Reflectivity: Using an infrared thermometer, we measured the roof surface temperature. The coated area was consistently 25-30°F cooler than an uncoated black EPDM section in direct sun, confirming the “cool roof” benefit.
Durability & Flexibility: The cured coating formed a tough, rubber-like skin that could be pressed and flexed without damage. It withstood foot traffic during subsequent maintenance without marking.
Beyond simple rain, the coating faced pine sap, bird droppings, and road grime. Cleaning was straightforward with a mild soap and water solution. The brilliant white finish also made it much easier to spot and inspect seams for future maintenance, a subtle but appreciated advantage.
The product’s claims of waterproofing, flexibility, and solar reflectivity held true in our testing. The 10-year warranty provides peace of mind, though only long-term observation will verify that claim. The “weekend project” timeline is accurate if you are well-organized and have a helper. Our Liquid Rubber roof kit honest opinion is that it performs as advertised when the instructions are followed meticulously.
Balancing these Liquid Rubber RV roof coating pros cons is key. The pros heavily favor long-term protection and performance, while the cons are mainly about initial effort and cost.
How does this system stack up against common alternatives like Dicor RPFRC1 or Heng’s Rubber Roof Coating?
| Feature | Liquid Rubber Complete Kit | Dicor RPFRC1 (1 Gal) | Generic Acrylic Coating |
|---|---|---|---|
| System Approach | Full system (cleaner, primer, coating, sealant) | Coating only | Coating only |
| Solar Reflectivity | Excellent (Brilliant White) | Good (White) | Varies |
| Warranty | 10 Years | 1 Year | Often None |
| DIY Ease | High (water-based, full instructions) | Medium | Medium-Low |
| Price Point | High (for complete kit) | Medium (per gallon) | Low |
Choose the Liquid Rubber kit if you have significant or multiple leaks, want a “set it and forget it” solution for 5-10 years, value interior cooling, and appreciate a single, comprehensive kit with guaranteed component compatibility.
Consider a simpler, single-gallon product only if you have a single, very small leak on a tight budget, or if your roof is in generally good condition and just needs a cosmetic refresh. For a detailed breakdown, read our head-to-head competitor analysis.
Do not underestimate the need to stir the coating. Use a heavy-duty drill mixer for at least 3-5 minutes per pail. Inadequate stirring leads to uneven consistency and poor performance.
Buy an 18-inch roller frame with a medium-nap roller sleeve (3/8″ or 1/2″), a 4-inch brush for edges, and a roller grid for the 5-gallon pail. This speeds up application immensely and ensures a smooth finish.
Applying the correct thickness is critical for the warranty. Use a wet mil gauge if possible. Visually, one coat will not be enough. Plan for two coats to achieve the proper, durable membrane.
Use painter’s tape along the roof edges and around fixtures before you start coating. Peel it off while the coating is still wet for perfectly clean, professional-looking lines.
If possible, have a helper. One person can cut in edges with a brush while the other follows with the roller. This keeps a “wet edge” and prevents lap marks, making the project faster and the finish more uniform.
The Liquid Rubber RV Roof Coating 40 Ft Leak Repair Kit has a current price of $689.95. While this is a significant sum, it’s essential to view it as an investment in your RV’s longevity. Compared to the $3,000-$5,000+ a professional roof replacement can cost, the DIY savings are enormous. The kit provides maximum value because it includes every component, eliminating hidden costs. The best place to purchase is directly from authorized retailers like Amazon to ensure you get a fresh, authentic product and reliable customer service.
The product is backed by a 10-year limited warranty against manufacturing defects when applied as directed. Liquid Rubber’s customer support is known for being responsive, especially for technical application questions. They offer detailed online resources and guides. Note the return policy: only full, unopened kits are typically accepted for returns, so be sure of your project scope before purchasing.
After extensive testing, the Liquid Rubber RV roof coating worth it question has a clear answer for most serious RV owners. It delivers exceptional waterproofing, proven solar reflectivity, and builds a flexible, durable shield. The complete system approach is its greatest strength, providing a foolproof path from problem to solution.
We highly recommend the Liquid Rubber RV Roof Coating Complete Kit. On a scale of 1-5, it earns a 4.5 out of 5. It loses half a point solely for the high upfront cost and physical demand of application, but these are far outweighed by the results. For anyone facing leaks or wanting to proactively protect their investment, this is the best RV roof coating for leaks in a DIY-friendly format.
If you need a permanent, high-performance solution for your RV roof and are willing to invest a weekend of work, the Liquid Rubber Complete System is an outstanding choice that will likely save you thousands in the long run. Click here to secure your kit and end roof leak worries for good.
Absolutely, if you have active leaks or an aging roof. While the $689.95 price tag is substantial, it’s a complete system that prevents catastrophic water damage, which can cost $5,000+ to repair. The 10-year warranty, energy savings from solar reflectivity, and peace of mind provide a strong return on investment, making the Liquid Rubber RV roof coating worth it for long-term owners.
Dicor makes good products, but they are typically sold as individual components (e.g., just the coating). The Liquid Rubber kit’s advantage is its all-in-one, guaranteed-compatibility system. Liquid Rubber also offers a longer warranty (10 years vs. 1 year for Dicor’s coating) and is specifically formulated as a water-based, low-odor product, which many DIYers prefer.
The learning curve is moderate but manageable for a diligent DIYer. The process is similar to painting a large, flat surface but with more emphasis on prep. If you can thoroughly clean a surface, use a roller, and follow detailed instructions step-by-step, you can successfully complete this project. Allow two full days for your first time.
The kit includes all chemicals and sealants. You will need to supply: an 18-inch roller frame and sleeves, a 4-inch brush, a paint tray or 5-gallon grid, a drill mixer, painter’s tape, and safety gear (gloves, glasses). A pressure washer for cleaning is highly recommended but not strictly required.
Liquid Rubber provides a 10-year limited warranty against defects when applied according to their instructions. Their customer support is accessible and known for providing helpful technical guidance for project planning and troubleshooting.
It depends. You can only apply it over an existing coating if that coating is in sound condition—fully adhered, not brittle or cracking. It must be thoroughly cleaned. The included EPDM Primer is crucial for adhesion in this scenario. If the old coating is failing, it must be completely removed first.
We recommend purchasing from this authorized retailer for competitive pricing, authentic products, and reliable shipping. Prices are generally consistent, but buying from major platforms ensures you benefit from buyer protection policies.
Stay Updated with Our Latest Reviews & Guides!
Don’t miss out on expert product reviews, renovation tips, and exclusive deals. Join our community of smart shoppers and DIY enthusiasts!
Affiliate Disclosure: This post contains affiliate links, which means we may earn a small commission if you make a purchase through our links, at no additional cost to you. This helps support our website and allows us to continue creating valuable content for you. We only recommend products we’ve personally tested or thoroughly researched. Thank you for your support!