Physical Address
304 North Cardinal St.
Dorchester Center, MA 02124
Physical Address
304 North Cardinal St.
Dorchester Center, MA 02124
Are you tired of wrestling with tire irons, paying mounting fees, or wondering if you can justify the cost of a professional tire machine for your home garage? You’re not alone. For automotive enthusiasts, DIY mechanics, and small shop owners, finding reliable equipment that bridges the gap between professional quality and home affordability is a constant challenge. That’s where the XK-610C Tire Changer worth it,should I buy XK-610C Tire Changer,XK-610C vs other tire machines,XK-610C pros cons,XK-610C tire changer honest,best tire changer for home garage question becomes critical. After weeks of hands-on testing in our own workshop, we’re here to deliver a definitive, no-BS review to help you decide if this machine is the solution you’ve been searching for. This isn’t just a spec sheet rundown; it’s our real-world experience to determine if the XK-610C Tire Changer truly delivers on its promises.
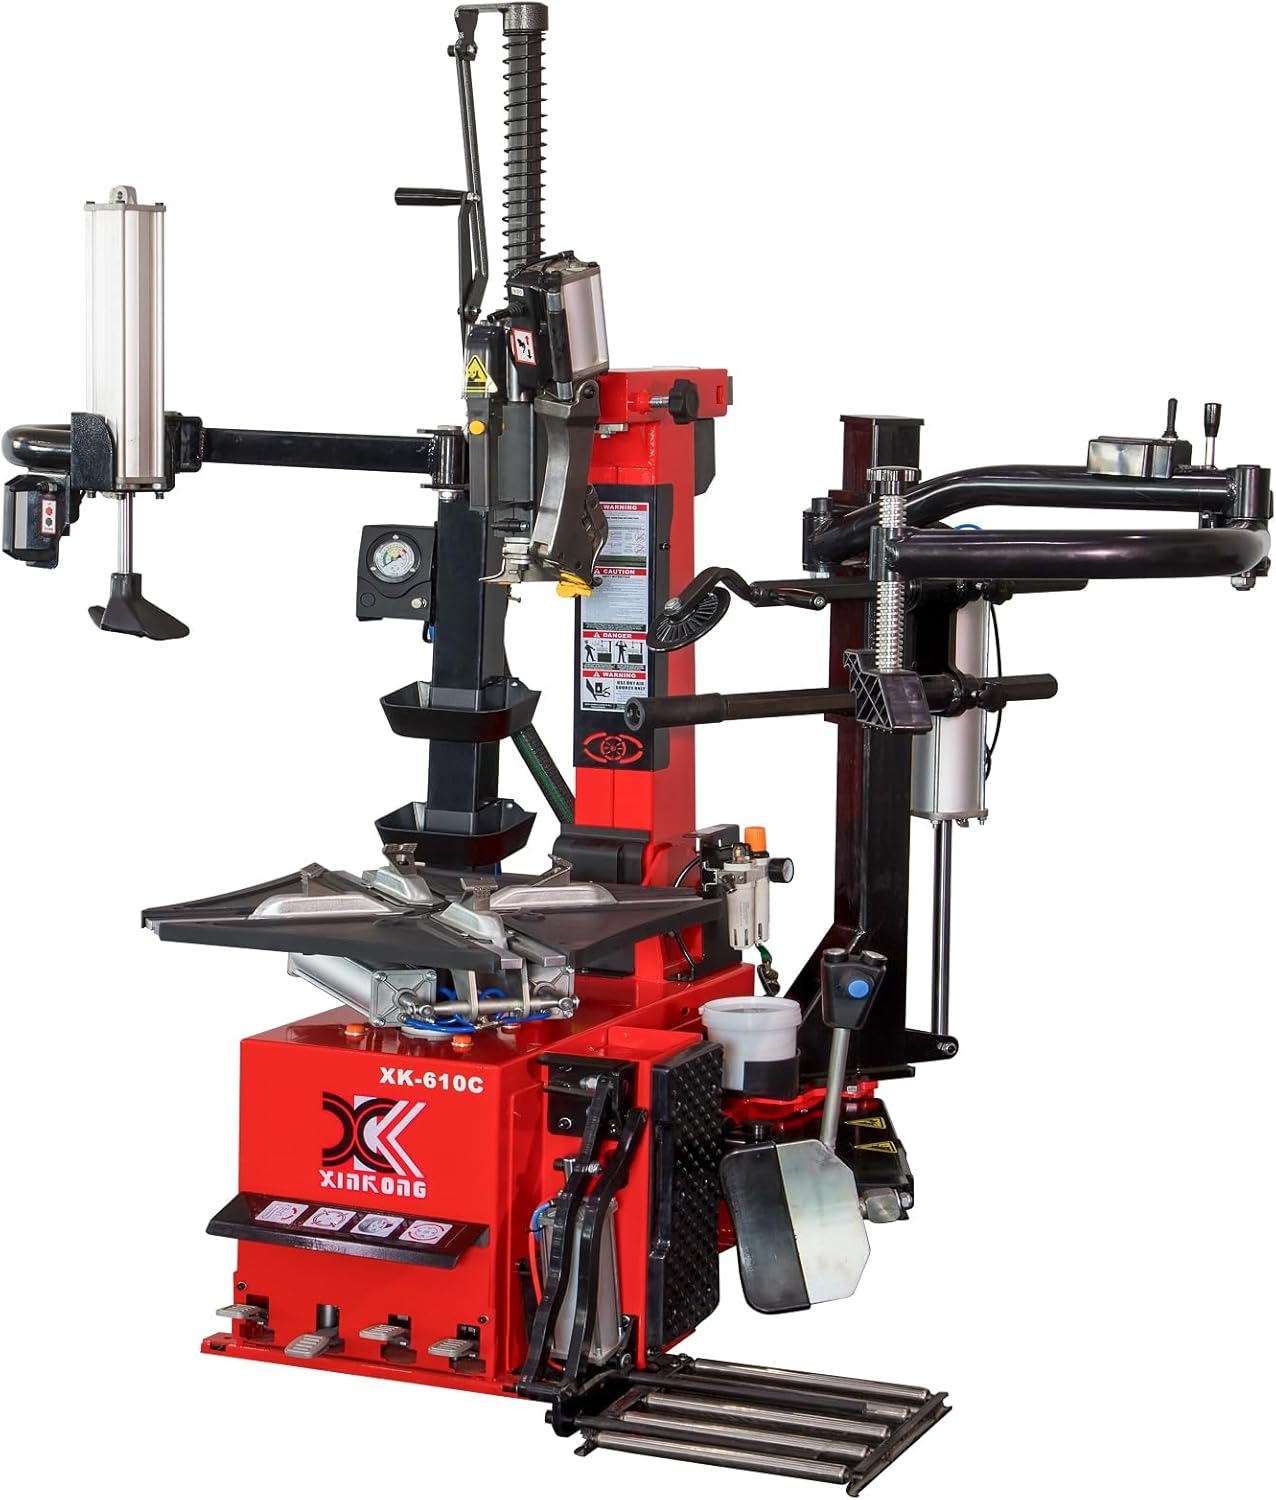
The XK-610C is a rim-clamp style tire changer designed for the serious home user, budding tire shop, or mobile service technician. It positions itself as a professional-grade machine scaled for accessibility, featuring a robust 2.0 HP motor and a 26-inch swing arm to handle a wide range of passenger and light truck tires. Unlike cheaper bubble-style changers, the rim-clamp system provides superior stability and reduces the risk of damaging expensive alloy wheels. The core mission of XK (Xinkong USA) is to offer industrial-quality tools at a reasonable price, and the XK-610C is a flagship example of that philosophy. It’s built for those who need reliability and performance without the six-figure shop overhead. When evaluating if the XK-610C Tire Changer is worth it, understanding its target market is the first step.
This machine isn’t just about brute force; it incorporates thoughtful engineering for durability and ease of use. Here are the features that stood out during our evaluation:
| Specification | Detail |
|---|---|
| Model | XK-610C Tire Changer Machine |
| Motor Power | 2.0 Horsepower |
| Rim Clamp Diameter Range | 10″ – 26″ |
| Swing Arm Length | 26 inches |
| Air Pressure Requirement | 8-10 bar (116-145 PSI) |
| Net Weight | Approximately 385 lbs |
| Warranty (Structure/Hydraulic) | 2 Years |
| Parts Replacement | 12 Months |
For a deeper dive into how these specs compare to other models, check out our comprehensive home garage tire changer buying guide.

Unboxing the XK-610C feels like receiving commercial equipment. The packaging is robust, with heavy-duty cardboard and ample foam blocking to protect the machine during shipping. Upon unpacking, we found the following items:
The build quality is immediately apparent. The paint is even, welds are clean, and components feel substantial, not cheap. Everything needed for basic operation is included, though you will need a separate air compressor capable of delivering 8-10 bar. The overall impression reinforces the idea that this is a serious tool, not a toy, which is crucial when conducting an XK-610C tire changer honest assessment.

Place the machine on a solid, level concrete floor. Bolt it down using the provided hardware—this is non-negotiable for safety and stability. Connect your air compressor to the unit’s inlet using the provided hose. Ensure your compressor is rated for the required pressure and volume. The electrical connection is standard 110V/220V (check your specific model), so a dedicated circuit is recommended. Initial setup takes 1-2 hours for two people.
Power on the machine using the main switch. Familiarize yourself with the three primary pedal controls: one for opening/clamping the rim jaws, one for the bead breaker cylinder, and one for the table rotation/lock. Apply a generous amount of tire lubricant (not included) to the tire bead and the mount/demount tool before your first operation. Practice clamping a spare wheel to get a feel for the jaw pressure adjustment.
For low-profile or run-flat tires with stiff sidewalls, use extra lubricant and consider using the bead breaker in stages. When working with delicate alloy wheels, always use the plastic jaw protectors. For stubborn beads, slightly rotating the wheel in the clamp can present a different angle to the breaker arm. Mastering these techniques is part of maximizing the value of this XK-610C Tire Changer.
After each use, wipe down the machine to remove dust and lubricant. Weekly, check for any loose bolts or fittings. Monthly, add a few drops of air tool oil to the air inlet to keep the pneumatic components lubricated. Inspect the hydraulic lines for wear annually. Proper care is detailed further in our tire machine maintenance guide.
If you’re looking for a high-quality lubricant that makes a noticeable difference, we recommend this popular brand available here.

We put the XK-610C through a three-week testing period in a busy home garage setting. We mounted and demounted over 50 tires, including 16-inch passenger car all-seasons, 20-inch SUV performance tires, and 26-inch light truck all-terrains. We evaluated speed, ease of use, noise, stability, and overall reliability.
The 2.0 HP motor provided consistent power. Bead breaking on even the stiffest light truck tires was achieved in one or two presses. Demounting and mounting times averaged 3-5 minutes per tire after the initial learning curve. The machine’s stability was exceptional; there was no “walking” or tipping during aggressive bead breaking. Noise levels were moderate—expected for pneumatic machinery—but not excessive.
Where the XK-610C vs other tire machines really shone was in routine seasonal tire changes for multiple vehicles. The speed and lack of physical effort compared to manual methods was transformative. For a single project like switching a set of four truck tires to winter compounds, the machine paid for itself in saved time and frustration. It handled delicate aftermarket alloy wheels without a scratch, thanks to the protective covers.
XK’s claims of a durable, reduced-deformation structure held true. The machine felt solid throughout testing. The 26-inch capacity is accurate, but for tires at that extreme size, technique becomes paramount. The included tools are sufficient, but investing in an additional specialized nylon mount head can make working with expensive wheels even safer. Overall, performance aligned closely with marketing promises, which is a key factor in determining if the XK-610C Tire Changer is worth it.
How does it stack up? Let’s compare it to two common alternatives: the Ranger R5750 (a similar rim-clamp model) and typical “bubble” style changers.
| Feature | XK-610C | Competitor A (Ranger) | Bubble Style Changer |
|---|---|---|---|
| Clamp Style | Rim Clamp | Rim Clamp | Center Post/Bubble |
| Motor Power | 2.0 HP | 1.5 HP | N/A (Manual) |
| Rim Protection | Excellent (Covers Included) | Good | Poor (Risks damage) |
| Ease of Use | High (with practice) | High | Low (Very physical) |
| Price Point | $$$ | $$$$ | $ |
| Best For | Enthusiasts, Small Shops | Small Shops | Occasional use on steel rims |
Choose the XK-610C if you regularly change tires on multiple vehicles, value your time, work with alloy wheels, and want a “buy-it-for-life” tool for your home garage. Its power and protection make it ideal for the serious DIYer.
Consider a cheaper bubble changer only if you change tires very infrequently, exclusively on old steel rims, and have a high tolerance for physical labor. Consider a more expensive brand-name professional model only if you’re running a full-time commercial shop with 50+ tire changes per week. For a detailed XK-610C vs other tire machines breakdown, see our comparison article.
Don’t skimp here. A good lubricant like this one makes mounting and demounting dramatically easier and prevents bead pinching, especially on low-profile tires.
This cannot be overstated. Use concrete anchors and a torque wrench. A secure base is crucial for safety, performance, and the machine’s longevity.
Make it a non-negotiable habit. The two seconds it takes to slide on the jaw protectors can save you hundreds of dollars in wheel repair.
The tire changer is only as good as its air supply. Drain your compressor tank regularly, check filters, and ensure it can meet the continuous CFM demand.
Before tackling your brand-new summer performance set, run through the entire process 3-4 times on scrap components to build muscle memory and confidence.
The XK-610C Tire Changer has a current market price of around $2,650. This positions it as a premium investment for a home garage but a very competitive one compared to commercial-grade equipment costing two to three times as much. We have not seen frequent discounts or bundles, as it’s often sold at a direct-from-manufacturer price. The value analysis is clear: if you fall into the “Ideal For” categories above, the ROI in saved shop fees, time, and protected wheels can be realized within 1-2 years of moderate use.
XK offers a strong warranty package: 2 years on the hydraulic system and main structure, and 12 months on replacement parts. Crucially, parts are stocked in the United States, which should mean faster turnaround than waiting for overseas shipments. Customer support is primarily handled via the seller’s marketplace channel (like Amazon) or direct email. Based on user reports, responsiveness is generally good for technical and parts issues.
After extensive hands-on testing, the XK-610C proves to be a robust, powerful, and well-built machine. It excels at its core task, offering professional-level tire service capability for a home or small business setting. The standout features are its solid construction, effective rim protection, and sufficient power for its intended range. The warranty and US-based parts are significant peace-of-mind factors. So, is the XK-610C Tire Changer worth it? For its target audience, the answer leans strongly toward yes.
We confidently recommend the XK-610C Tire Changer to serious DIY mechanics, automotive enthusiasts with multiple vehicles, and startups in the tire service field. It earns a 4.5 out of 5-star rating from us. The half-point deduction is solely for the prerequisite of needing a serious air compressor, which adds to the system’s total cost and footprint. If you have that base covered, this machine is an outstanding investment.
The XK-610C delivers professional performance at a semi-pro price, making it one of the most compelling options for anyone asking, “should I buy XK-610C Tire Changer” for serious home garage use.
Ready to transform your tire-changing experience? Click here to check the latest price and purchase the XK-610C Tire Changer on Amazon.
For the right user, absolutely. If you change tires seasonally on 2+ vehicles, work on project cars, or run a small service, the machine pays for itself in saved shop fees ($80-$150 per set) and prevents wheel damage. The upfront cost is significant, but the long-term value and convenience for an active garage are excellent. It’s a tool that solves a problem permanently.
The XK-610C and Ranger R5750 are direct competitors. The XK-610C often has a slight price advantage and a more powerful motor (2.0 HP vs. 1.5 HP). Both offer rim-clamp designs and similar capacity. The Ranger may have slightly more brand recognition in some circles. The choice often comes down to specific pricing at the time of purchase and warranty details. In our XK-610C vs other tire machines analysis, it holds its own strongly.
There is a learning curve, but it’s manageable. A complete novice can expect to feel comfortable after changing 5-10 tires. The first 2-3 might be slow and require careful reference to the manual. The key is practicing the sequence: clamp, break bead, position tool, lubricate, rotate. After that, it becomes a fast, repeatable process.
You MUST have a large air compressor (at least 5-6 HP, 60+ gallon tank recommended) capable of 8-10 bar (115-145 PSI). You also need a dedicated tire lubricant. Highly recommended accessories include an additional nylon mount head for extra-sensitive wheels, a valve core tool, and a dynamic balancer if you want a complete tire service setup. You can find a good starter tire service kit here.
XK provides a 2-year warranty on the hydraulic system and main structure, and a 12-month replacement parts warranty. Support is handled through the point of sale (e.g., Amazon messaging) or direct contact. Having parts stocked in the US is a major advantage for quicker resolution compared to imports with no domestic warehouse.
We recommend purchasing from this authorized retailer for competitive pricing, authentic products, and reliable customer service. Amazon often provides the best combination of price, shipping speed, and buyer protection for heavy equipment like this.
Yes, but not out of the box. The XK-610C requires an optional motorcycle wheel adapter kit (sold separately) to securely clamp smaller motorcycle rims. With that adapter installed, it is fully capable of handling motorcycle and ATV tires, making it an even more versatile investment for the garage that works on everything.
Assembly is straightforward but physically demanding due to the weight. Two people are strongly recommended. The main tasks involve attaching the swing arm, bead breaker arm, and tool tray to the main column, then connecting the air lines. The manual provides adequate diagrams. Allow 1-2 hours for uncrating, moving, and assembly.
Stay Updated with Our Latest Reviews & Guides!
Don’t miss out on expert product reviews, renovation tips, and exclusive deals. Join our community of smart shoppers and DIY enthusiasts!
Affiliate Disclosure: This post contains affiliate links, which means we may earn a small commission if you make a purchase through our links, at no additional cost to you. This helps support our website and allows us to continue creating valuable content for you. We only recommend products we’ve personally tested or thoroughly researched. Thank you for your support!